Microneedling for Acne Scars A Complete Guide
If you've been searching for a real solution for acne scars, you've probably heard about microneedling for acne scars. It’s a treatment that genuinely works by kicking your skin's own healing powers into overdrive, helping to smooth out those lingering reminders of past breakouts.
Your Path to Smoother Skin Starts Here
Acne scars can be stubborn. They stick around long after the breakout has cleared, affecting your skin's texture and, let's be honest, sometimes your confidence too. While countless creams and serums promise the world, microneedling takes a different approach. It works with your body, encouraging it to rebuild smoother, stronger skin from deep within.
Think of it this way: your skin is like a piece of fabric. When you get an acne scar, it's like a thread has been pulled, creating a small pucker or dent. Microneedling uses a specialized device with ultra-fine needles to create thousands of tiny, controlled micro-punctures in that fabric. These little channels are practically invisible, but they send a powerful signal to your skin: "It's time to repair!"
This process triggers a cascade of healing, sending fresh collagen and elastin to the area to remodel the scar tissue from the inside out.
Who Is an Ideal Candidate for Microneedling?
This treatment is a game-changer for people dealing with atrophic acne scars—the kind that are sunken or pitted. It's particularly great for the common "boxcar" and "rolling" types that create an uneven skin surface.
While it's safe for most skin tones, it's not for everyone. A professional consultation is a must to make sure it's the right choice for you. For instance, it’s generally not performed on anyone with active acne, skin infections, or certain inflammatory skin conditions.
You're likely a great candidate if you:
- Have indented (atrophic) acne scars.
- Are hoping to improve overall skin texture and tone.
- Understand that results take time and a few sessions.
- Are ready to commit to the recommended treatment plan and aftercare.
Microneedling is not a quick fix. It’s a process of renewal. The real magic happens over weeks and months as your skin builds new collagen, gradually filling in and smoothing out the scars.
To help you get a sense of the journey, here’s a quick snapshot of what to expect.
Microneedling for Acne Scars At a Glance
The table below breaks down the key aspects of the treatment process.
| Aspect | Details |
|---|---|
| Best For | Atrophic scars (boxcar, rolling), uneven texture, and enlarged pores. |
| Primary Benefit | Stimulates collagen production to fill in and smooth out indented scars. |
| Typical Sessions | 3 to 6 sessions, spaced approximately 4-6 weeks apart for best results. |
| Expected Downtime | Minimal, with most experiencing redness similar to a mild sunburn for 24-72 hours. |
Ultimately, by creating this controlled healing response, microneedling for acne scars does more than just mask the issue. It prompts your skin to genuinely rebuild itself, restoring its foundation for results that last.
How Microneedling Rebuilds Your Skin
Let's break down exactly what's happening beneath the surface when you get a microneedling treatment. Think of an acne scar as a patch of hardened, disorganized tissue. It's like a tiny knot under your skin. Microneedling works by methodically breaking up that old scar tissue and telling your body to build something new and better in its place.
The procedure creates thousands of microscopic, controlled injuries in the skin. This isn’t random damage; it’s a very precise signal that kicks your body's natural wound-healing process into high gear. This cascade of healing happens in three distinct stages, all designed to replace that old, tough scar tissue with smooth, healthy skin.
Phase 1: The Inflammation Response
Right after the treatment, your body’s first responders—your immune system—rush to the scene. This initial stage is called the inflammation phase. It’s your body’s way of cleaning house, clearing out old cells and damaged tissue to make way for new construction.
This is why your skin looks red and feels a bit warm immediately following a session. It’s not something to be concerned about; in fact, it's a fantastic sign! That redness is visible proof that the healing process has successfully been triggered.
Phase 2: The Proliferation and Building Stage
Now for the exciting part. A few days after the initial inflammation, your skin enters the proliferation phase. This is when the construction crew arrives. Specialized cells called fibroblasts get the signal to start spinning up brand-new collagen and elastin fibers.
Initially, they produce a lot of Type III collagen, which acts like a soft, flexible scaffolding to fill in the pitted areas left by acne scars. This new matrix begins to lift the indentations from below, gradually bringing them up to the level of the surrounding skin. This is the very essence of "collagen induction therapy," which you can learn more about in our guide to microneedling as collagen induction therapy.
This infographic gives you a great visual of how this process unfolds, taking your skin from scarred to smooth.
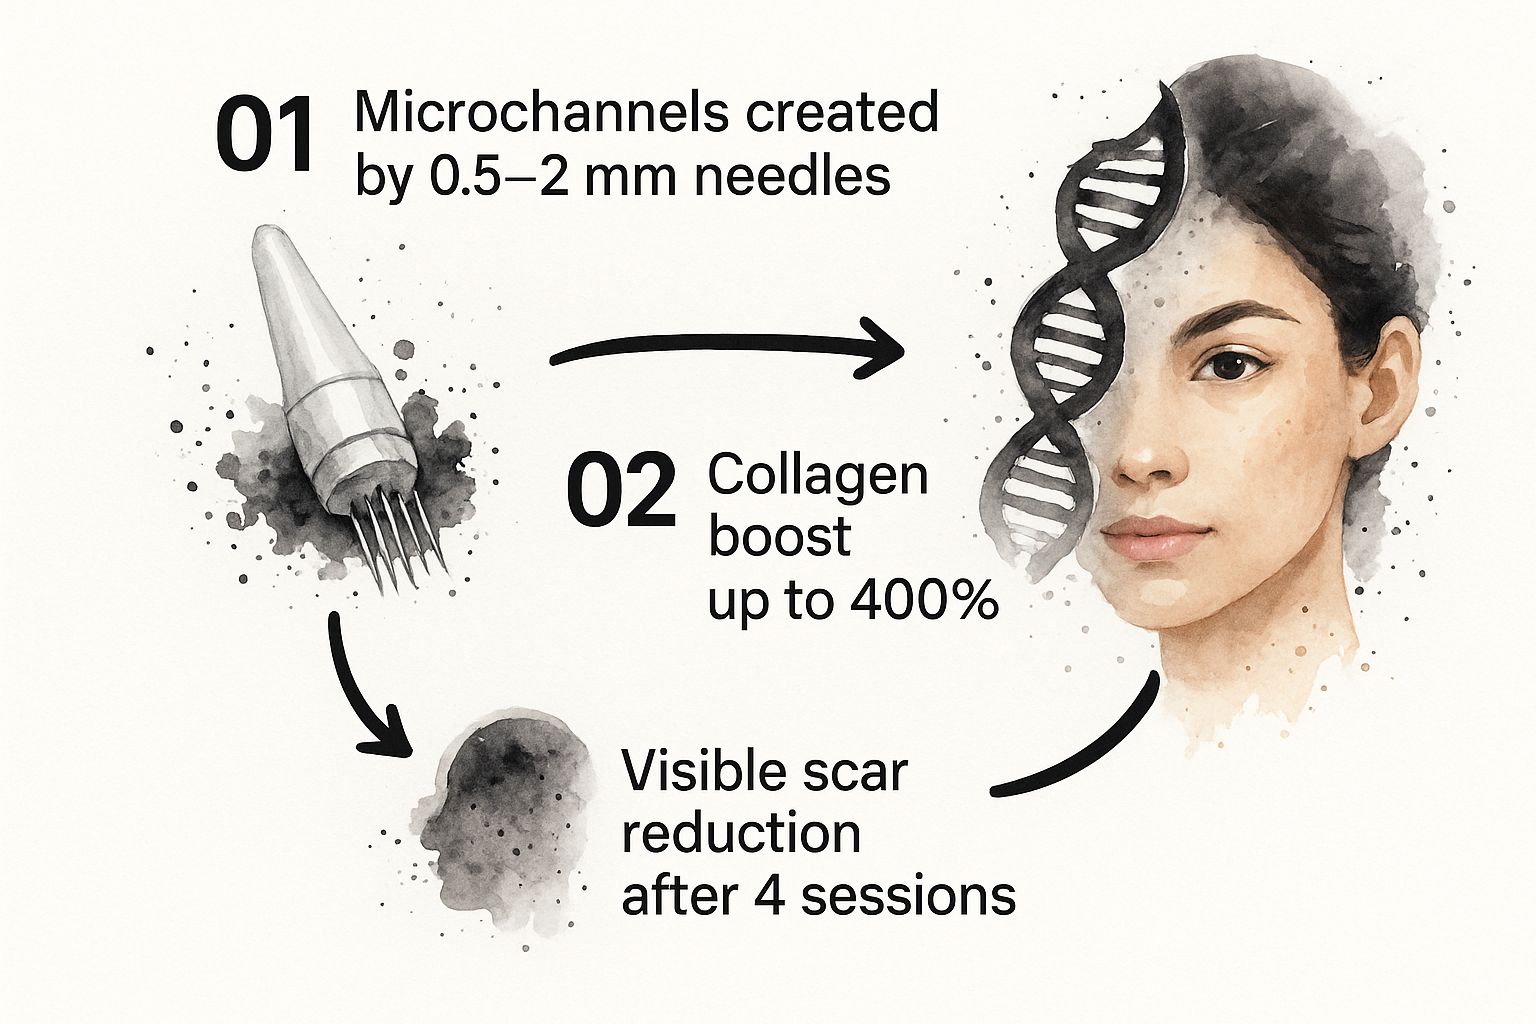
By creating these tiny channels, microneedling can stimulate a collagen increase of up to 400%, leading to real, visible improvements in skin texture over a series of treatments.
Phase 3: The Remodeling and Maturation Stage
The final step is the remodeling phase, and it’s a long-term game. This stage can continue for a year or even longer after your treatments are done. During this time, that soft, initial Type III collagen is gradually replaced by the much stronger and more organized Type I collagen—the very same kind that makes up smooth, healthy skin.
This is why the results from microneedling keep getting better over time. Your skin is busy behind the scenes, reorganizing and strengthening its new foundation, which makes the surface smoother and firmer. The most dramatic improvements often show up months after your last session.
A simple way to think about it:
Phase 1 is the cleanup crew clearing the site.
Phase 2 is the construction team building the new framework.
Phase 3 is the finishing team, strengthening and perfecting the structure.
Each treatment builds on the one before it, methodically encouraging your skin to replace damaged tissue with a fresh, resilient, and beautifully smooth new surface.
The Evolution of Skin Renewal Technology

When you see the sleek, pen-like devices used for microneedling for acne scars today, it's easy to think of them as a brand-new invention. But the core idea—using tiny, controlled punctures to kickstart the skin's healing process—is actually more than a century old.
Understanding this history isn't just a fun fact. It builds confidence in the procedure. It shows us that microneedling isn't some fleeting trend but a technique built on decades of medical observation and a solid understanding of the skin's amazing ability to repair itself.
From Abrasive Tools to Fine Needles
The earliest version of this concept dates back to 1905. A German dermatologist named Ernst Kromayer began using motor-driven dental burs to treat scars and hyperpigmentation. It was a pretty rudimentary approach, basically using small, abrasive wheels to resurface the skin. Still, he was onto something big: injuring the skin's surface could trigger a powerful regenerative response.
It wasn't until the mid-1990s that things really started to look more like the microneedling we know today. The next breakthroughs came from two different plastic surgeons who, through keen observation, realized just how effectively needles could remodel scar tissue.
A major lightbulb moment came from an unlikely place: tattooing. One surgeon noticed that when scars were tattooed, they improved not because of the ink, but because of the repetitive motion of the tattoo needles. This simple observation shifted the focus from broad abrasion to precise, needle-based stimulation.
The Pioneers of Modern Microneedling
In the 1990s, two key innovators really pushed the field forward. First, there was Canadian plastic surgeon Dr. Andre Camirand. He noticed that "tattooing" scars without any ink—a technique he called "needle dermabrasion"—visibly flattened them and improved their texture. His work was solid proof that the micro-injuries alone were enough to trigger significant skin remodeling.
Around the same time, South African plastic surgeon Dr. Desmond Fernandes was busy creating a tool specifically for this. He invented the first dermaroller, a small handheld drum covered in fine needles. This simple device made it possible to create thousands of consistent micro-channels in the skin to fire up collagen production. To see just how microneedling's history unfolded over the past century, you can trace the detailed timeline of these developments.
The Rise of Automated Microneedling Pens
The dermaroller was a game-changer, but it wasn't perfect. The rolling motion could sometimes create V-shaped channels that tore the skin slightly. It was also impossible to change the needle depth for different parts of the face, like the delicate under-eye area versus thicker-skinned cheeks.
The next logical step was the automated microneedling pen. These devices fixed the roller's main issues by using a stamping motion—the needles move straight up and down at high speeds. This creates clean, vertical channels that are much less traumatic to the skin.
This leap forward brought some major advantages:
- Precision: Practitioners can now adjust needle depth with incredible accuracy, customizing the treatment for everything from fine lines to deep scars.
- Consistency: The automated motor ensures every single puncture is uniform, leading to more predictable and even results.
- Safety: Cleaner channels mean less risk of tearing the skin and, ultimately, less downtime for the patient.
This journey from abrasive burs to rollers and finally to sophisticated pens shows a clear path toward greater precision, safety, and effectiveness. The microneedling for acne scars treatments we have today stand on the shoulders of over 100 years of scientific progress, making them one of the most trusted tools we have for skin rejuvenation.
A Step-by-Step Walkthrough of Your Session
The idea of microneedling can sound a little intimidating, but knowing what to expect can make all the difference. In reality, it's a straightforward and highly controlled procedure. Let's walk through what a typical session for acne scars looks like from start to finish.
First things first, your practitioner will thoroughly cleanse your skin. This isn’t just a quick wipe-down; it’s a crucial step to remove every trace of makeup, oil, and bacteria. This creates a sterile surface, which is key for preventing infection and ensuring the treatment is as effective as possible.
Numbing for Maximum Comfort
With your skin prepped and clean, a topical numbing cream is applied to the entire treatment area. You'll then relax for about 30 to 45 minutes while it works its magic. This is the perfect time to scroll through your phone or ask any last-minute questions you might have.
The goal here is simple: to make the experience comfortable. While you'll still feel some sensation—most people describe it as a light scratching or vibration—the numbing cream takes the edge off completely. It's more of a strange feeling than a painful one.
The Microneedling Procedure
Once you’re fully numb, the cream is removed, and your skin is prepped one last time. Your provider will then apply a special gliding serum, usually one rich in hyaluronic acid. This helps the microneedling device move smoothly across your skin and delivers hydrating ingredients directly into the micro-channels being created.
Then, the actual microneedling begins. Your practitioner will methodically guide the device over the scarred areas. They'll adjust the needle depth based on the specific part of your face—using a deeper setting for stubborn scars on the cheeks and a much shallower one for delicate skin around the forehead. The actual needling part is surprisingly fast, typically lasting only 15 to 20 minutes for the entire face.
Your provider is in complete control throughout the session. They constantly monitor how your skin is reacting, ensuring the treatment is effective for your scars while remaining safe for your skin type. Their expertise is what makes this process so successful.
What to Expect Immediately After
As soon as the treatment is over, your skin will look and feel like you have a mild sunburn. Expect to see some redness and feel a bit of warmth and tightness. Don't worry, this is actually a good thing! It's a visible sign that your body's natural healing and collagen-building processes have kicked into high gear.
To finish, your provider will apply a calming serum or mask to soothe the skin. You'll also get a detailed set of aftercare instructions—following these is essential for healing properly and getting the best results. The redness usually fades significantly within 24 to 48 hours, making the downtime for this powerful treatment impressively short. You'll walk out the door knowing the skin-rebuilding has already begun.
Essential Aftercare for Optimal Healing and Results
What you do after your microneedling session is just as important as the treatment itself. Honestly, proper aftercare is what really unlocks the best results, speeds up your recovery, and helps your skin heal beautifully. It’s all about protecting your investment.
The healing process happens in stages, and each one has its own simple—but non-negotiable—rules. If you follow this timeline, you'll give your skin exactly what it needs to regenerate and get the most out of your microneedling for acne scars treatment.
The First 24 Hours: Your Top Priorities
Right after your session, your skin is at its most vulnerable. Think about it: all those tiny micro-channels are still open. This makes your skin incredibly absorbent, but also susceptible to irritation and bacteria. For the first day, the goals are simple: keep it clean, keep it calm, and keep it hydrated.
Your practitioner will probably put a soothing serum on your skin, and your best bet is to just leave it be. For the rest of the day, it's a strict hands-off policy.
Here’s the game plan:
- Avoid touching your face. This is a big one. It prevents you from transferring bacteria to your sensitive skin.
- Do not apply any makeup. Your skin needs to breathe and heal. Makeup will just clog and irritate it.
- Skip your regular skincare routine. No cleansers, toners, or fancy serums unless specifically recommended by your provider.
- Stay out of the sun. Direct sunlight can cause some serious irritation and lead to hyperpigmentation.
I like to tell my clients to think of their skin like a freshly seeded lawn—it needs to be left completely alone to do its thing.
Days Two to Five: Navigating the Healing Phase
Once you’ve passed the 24-hour mark, you can slowly introduce a very gentle skincare routine. Your skin will likely still feel a bit sensitive, dry, or tight as the healing really kicks in. The focus now shifts to gentle cleansing, serious hydration, and rock-solid protection.
You can start washing your face with a mild, non-exfoliating cleanser and lukewarm water. When you're done, gently pat your skin dry with a clean towel. No rubbing! After cleansing, a simple, hydrating serum with an ingredient like hyaluronic acid is perfect for replenishing moisture.
During this period, your skin is working overtime to rebuild itself from the inside out. Providing a calm, hydrated environment is the best support you can offer. Avoid any products that could cause irritation or inflammation.
This is also when sun protection becomes absolutely critical. You need to apply a broad-spectrum mineral sunscreen with an SPF of 30 or higher every single morning, even if you’re just staying indoors. This is the single most important step to prevent post-inflammatory hyperpigmentation—those stubborn dark spots that can pop up after inflammation.
Here's a quick list of what to strictly avoid during this critical healing window:
- Harsh Ingredients: Stay far away from retinoids, vitamin C serums, alpha-hydroxy acids (AHAs), beta-hydroxy acids (BHAs), and any kind of exfoliant.
- Strenuous Activities: Avoid intense workouts, saunas, or steam rooms. Anything that causes excessive sweating and heat can irritate your healing skin.
- Swimming: Definitely steer clear of pools and hot tubs. The chlorine and bacteria are a recipe for infection and irritation.
The Following Weeks: Protecting Your Progress
As your skin continues to heal over the next week or so, you can gradually bring your regular skincare products back into the picture. A good rule of thumb is to wait about a week before reintroducing your normal routine, but always listen to your skin. If a product stings or causes redness, stop using it and give your skin more time.
Sunscreen remains your absolute best friend. Keep applying it every single day to protect the new, delicate skin cells that are forming. This ensures the collagen remodeling process can proceed without any interruptions from sun damage.
For a more detailed breakdown of what products to use and when, our complete guide on microneedling aftercare instructions that actually work offers more in-depth advice.
By committing to this aftercare playbook, you’re setting your skin up for success. You’ll reduce the risk of complications and get much closer to achieving that smooth, even-toned complexion you’re working toward.
Understanding the Benefits and Realistic Outcomes
When you're looking into microneedling for acne scars, the main goal is pretty simple: you want smoother skin. But what does that really mean, and what kind of results can you actually count on? The treatment's real power is in its ability to rebuild your skin from the inside out, making a huge difference, especially for certain types of scars.
Microneedling really shines when treating atrophic scars—those are the indented or pitted marks that acne can leave behind. We're talking about rolling scars that give the skin a wavy look, and boxcar scars with their sharper edges. By creating those tiny micro-injuries, the treatment kicks your body's collagen production into high gear to fill in those depressions, slowly but surely leveling out your skin's surface.
It's so important to have the right mindset, though. Microneedling is a journey, not an instant fix. The aim is significant, visible improvement, not a complete magic erasing of every single mark.
More Than Just Fading Scars
While tackling scar depth is the top priority, microneedling brings a whole host of other welcome benefits to the table. Think of it less as just a scar treatment and more as a complete skin reset.
Clients often come back telling me about all the positive changes they see in their skin. It’s not just one thing; it's a combination of improvements that add up.
- Smoother Overall Texture: All that new collagen makes your skin feel softer and more refined to the touch.
- Smaller-Looking Pores: As the skin tightens and gets firmer, pores often appear less noticeable.
- Brighter, More Even Skin Tone: The process can help break up mild pigmentation issues, leaving your complexion looking more radiant.
- A Healthy Bounce: By stimulating both collagen and elastin, microneedling helps bring back that firm, youthful feel to your skin.
So, you see, you’re not just targeting scars. You’re elevating the health and appearance of your entire face.
What the Data Says About Efficacy
This isn't just about what I've seen in my practice; the results are backed by solid clinical research. When you look at the numbers, microneedling shows impressive success in improving atrophic acne scars.
Studies consistently show an improvement of 30% to 60% in the appearance of scars after a series of 3 to 6 sessions. In one major study, a full 87% of patients reported a significant improvement in both their skin's texture and the depth of their scars. With patient satisfaction rates frequently topping 80%, it's clear most people feel the treatment delivers real cosmetic value. You can dive deeper and read the full research on microneedling efficacy yourself.
This high satisfaction rate drives home a key point: even a partial improvement can make a world of difference in your confidence. It’s all about progress, not perfection.
The results don't happen overnight. You won't leave your first appointment with flawless skin. The real work happens in the weeks and months that follow each treatment, as your body is busy building that fresh, healthy tissue. The exact number of treatments you'll need is completely unique to you and your skin, a topic we cover in our guide on how many microneedling sessions for acne scars are generally needed. This gradual, steady approach is what creates such natural and lasting changes, giving you a complexion you can truly feel good about.
Got Questions? We've Got Answers
It's totally normal to have a few questions swirling around, even after you get the basic idea. Let's walk through some of the most common things people ask about microneedling for acne scars so you can feel completely confident about what to expect.
Does It Hurt? Is It Actually Safe?
I get this question all the time, and the honest answer is: not really. Most people find the treatment surprisingly comfortable.
That's because your technician will apply a strong topical numbing cream about 30 to 45 minutes before starting. This takes the edge off, turning the sensation into something more like a light vibration or the feeling of fine-grit sandpaper gliding over your skin.
When it comes to safety, microneedling has a great track record, as long as it’s done by a trained and licensed professional. The absolute golden rule is using sterile, single-use needle cartridges for every single client. This practice is non-negotiable and basically eliminates any real risk of infection.
The most you'll likely deal with is some redness and minor swelling for a day or two—think of a mild sunburn. This typically clears up within 24 to 72 hours.
How Many Treatments Will I Need (And What's the Damage)?
This is the classic "it depends" answer, but it's the truth. The number of sessions you'll need really hinges on how deep and old your scars are.
On average, you can expect to need somewhere between 3 to 6 sessions for a noticeable, lasting change. We space these appointments about four to six weeks apart. This gap is crucial; it gives your skin the downtime it needs to heal properly and kickstart that all-important collagen production.
When it comes to cost, prices can swing a bit depending on where you live and the practitioner's experience. You can generally expect to pay anywhere from $200 to $700 per session. A pro tip: always ask about package deals. Many clinics offer a discount if you book a series of treatments upfront, which can make the whole process a lot more budget-friendly.
Can I Mix Microneedling with Other Skin Treatments?
Absolutely! In fact, combining treatments is often how we get the best, most dramatic results. This strategy, which we call combination therapy, can seriously level up your skincare game.
A popular and powerful pairing is microneedling with Platelet-Rich Plasma (PRP). You might have heard it called a "vampire facial." We apply your own plasma right after the microneedling is done, and it acts like a super-fertilizer for your skin, boosting healing and collagen growth like crazy.
You can also alternate microneedling with other treatments, like chemical peels or certain types of laser therapy. The key is timing—you have to schedule them carefully to avoid overwhelming your skin. The best move is to chat with a skincare professional who can map out a smart, safe plan tailored just for you.
Ready to start your journey to smoother, clearer skin? At Olive Skin Therapy, Olivia Codd creates expert microneedling plans customized to your unique goals. Book your consultation today and let's find the right path to reducing your acne scars for good.